Friday, June 29, 2012

Pros and Bronze/Optical Illusion Gradient

It's no secret I love glitter gradients. They are super easy and you simply cannot go wrong. They always look good. Many times when I do my gradients, I sift through my untrieds and force myself to use them. This is how this combination came to be. And I love it. 

This is three coats of OPI Pros and Bronze, which came out last summer in one of the Serena Williams set. This polish is absolutely gorgeous on its own and over black. Then I dabbed on China Glaze Fireside Glow (Ulta Holiday exclusive 2011) and then topped it with the one China Glaze Prismatic I just *had* to have, Optical Illusion. The green tint of this glitter really pops over Pros and Bronze, and what can I say, I love it. 


 Even indoors, the shimmer-glitter gradient looked amazing.

Yes, this might be an odd combination, but it's a favorite of mine. What are you favorite glitter gradient combos?

Wednesday, June 27, 2012

Pretty and Polished Pool Party

Now that the summer is full blown, this is such a perfect polish! Pretty and Polished Pool Party is a sheer-ish bright blue, with tons of random glitter. Because it was sheer, I decided to layer 1.5 coats over one coat of Zoya Robyn (which I think were the perfect undies). I say 1.5 coats because I wasn't exactly happy with the glitter pay off from one coat. I wanted more! This is one of those polishes that I inverted for about ten minutes before I used it because I wanted more glitter. If you like less glitter, then slap one coat on.

I took pictures in various lighting because sometimes the blue seems muted, but it is very bright! Also, the shimmer is definitely visible, but I needed to use flash for it to show up on my camera. Thankfully none of the bar glitter stuck up and this was smooth with one coat of Seche Vite.

 See the shimmer? It's gorgeous.


When I wore this polish, the cashier at Trader Joe's told me I had a party on my nails. This is a perfectly named polish! Hope you are all beating the heat!

Friday, June 22, 2012

KBShimmer Key Lime Pie for the Start of Summer

 
KBShimmer is an awesome indie brand of polish and I can't say enough of the customer service that Christie offers. Shipping is crazy fast and all of her colors are jam packed with glitter and amazing pigment. I first bought my KBShimmer's back in April and when Christie announced her new colors for May, I knew I needed Key Lime Pie. Lime green is my weakness and this polish did everything I wanted and more.

It looks like it needs undies, but this is two coats on its own. I will say this bar glitter does need to be a little manipulated to stay down as there is SO much glitter. There are gold shards, gold bars, white hexes, smaller white and green glitter, and some more I am probably missing, all in a lime green base.

On the ring finger, I tested OPI by Sephora's Real 18K Gold Top Coat. I do love it, but at $30 I am not ready to make that purchase.


Then I decide to play around with some tape before I removed my manicure. I cut out a bunch of tiny strips of tape, placed them randomly on the nail, and used one coat of Zoya Apple. It's not bad, but I need to work on my taping skills. 

I already bought two more KBShimmers since she re-opened her shop of Monday. You can purchase her stuff here but be sure to note her current shipping policies. If you are international, Harlow & Co just recently started carrying her stuff. I have many more KBShimmers to show you and I can't wait to get my next order from her!


Wednesday, June 20, 2012

Whipped Cream Nails in Honor of My Jester

Today wraps up my week of my most meaningful nail art and it is a design that makes me both happy and sad. In November 2009, my family was blessed when a new face joined our family, a beautiful 4 year old cat named Jester. We adopted him from another family. Please, if you are ever looking for a pet, adopt and do not buy one. No matter their age, animals are still loving creatures and will adapt to their new surroundings. I didn't grow up with a pet (unless you count 14 birds), so I had no idea how much of an impact Jester would have on my life. 

Jester LOVED his Halloween bib and wore it proudly

He also enjoyed wearing bandanas

I loved his serious looks, too. I called him The Professor when he looked like this.

Jester was a big boy and we quickly saw he LOVED human food. Of course we had to watch his weight, so we only gave him small treats. His absolute favorite treat was whipped cream. He always knew when I was about to take it out and would quickly run to me. This past April, Jester suddenly passed, and I still miss him every day. After his death, I decided to do some nails as he loved to hang out with me whenever I did my nails. Whenever I think of nail art, I like to do Google searches to see what has been done. Ultimately, I found inspiration from Kayla Shevonne's Ice Cream Nail design.


While I do miss him, I know he is in kitty heaven. I thank you all for coming back and reading my stories about some personal nail art. Hopefully you have a clue as to who I am and will come back to read as I show all types of polish, nail art, and glitter combinations!

Don't forget to head over and "like" my page on Facebook

Tuesday, June 19, 2012

Ehmkay Nails is Now on Facebook!

Hi everyone,

Another quick post for today! I now have a Facebook page. Please head over and "like" it so you can be connected with me over there as well. I will update that page with new blog posts as well as post nail and jewelry teasers! Thanks for following me!

Father's Day Dots

Although my dad rarely notices my nails (except Claire's Night Sky...that one he LOVED), I figured I would do my nails in his favorite color for father's day. I even made him cuff links with Lynnderella Cauldron Drippings. I whipped out most of my oranges and tried to think of some way to do simple nail art as I was short on time. This is what I came up with.

I started with a base of China Glaze Riveting, which came out with their Hunger Games collection this past spring. It is such a vivid, intense glassfleck orange. It was perfect in two coats. I then randomly placed dots in different colors cascading down my nails. For thirty minutes, this was pretty awesome and dad loved it.


I wore it shiny for 2 days and then decided to mattify the look. WOW. Just wow. The gold shimmer in Riveting really comes out when it is matte. Which look to do like better? Shiny or matte?


For the dots I used:

Zoya Myrta
Zoya Arizona
China Glaze Surfin for Boys
Essie Tangerine
Wet N Wild Magic Trident

Sunday, June 17, 2012

Etsy Shop Teaser Pics!

As I mentioned in my first post, I am also opening up an etsy shop called ehmkay designs! I am really excited to start so many different ventures. I thought it might be fun to show some close ups of some of my pieces so you can get of an idea of my combinations. 


So what do you think so far? I will also be doing custom orders that will suit your color preferences. All of my pieces have 4-10 polishes so I really think ahead of what kind of look I want to achieve. Any of these grabbing your eye?

Saturday, June 16, 2012

Glitter. Gradient. Graduation.

So as I continue my week showing you my most meaningful nail art, I realize there are different variations of nail art. This one is much more accessible for anyone to do and I got asked all day who did my nails when I wore this look.

I love glitter. It is no secret. But for My Masters Commencement, I wanted to be somewhat classy. Glitter gradients can really look intricate with not much work. I really think this was the perfect balance of fun, glitzy, and sophisticated.

I started with two thicker coats of OPI Don't Touch My Tutu, which is a great white jelly. Then I ripped off a small piece of a makeup sponge. Putting a small amount of polish on a piece of tin foil (which I re-use from prior glitter removal), I dab the sponge onto the polish and on my nail.

I used OPI Pirouette My Whistle, then Dollish Polish Heart of Glass, and finished the tips with China Glaze Lorelei's Tiara. I have to say, I loved this look! Heart of Glass has a sheer linear holographic base with holographic shards and it added that extra oomph to this manicure. 


Blurred here to show off the holographic goodness

Have you tried a glitter gradient? It's one of my favorite looks and is so simple to achieve. What were you favorite color combos? Until tomorrow...

P.S. Any Office fans out there? Because after I wrote my title, I totally thought of Dwight Schrute says "Beets. Bears. Battlestar Galactica."

Wednesday, June 13, 2012

Meet the Mets...on my Nails

As promised, this week I will be showing nail art that have more meaning besides being fun.
Being from the NYC area, I am lucky to have not one, but two baseball teams to root for. The better half had never been to a baseball game in his life, and my mom surprised us with 9th row field seats only a few days before my birthday. I'm so glad that A. Santana pitched a no hitter the night before so the atmosphere was great B. Wright hit a home run and the boyfriend got to see the famous Shea Stadium (now Citi Field) big apple rise, and C. The Mets won! And by a lot. 

Zoya Arizona was the perfect Mets orange. The formula was fantastic and I only needed two coats. On top, I was able to finally use NailVenturous's Burst of Blue. I had it in my untrieds for a while and this was the perfect use! This polish is so jam packed with glitter, it is crazy! What you see is one coat (yes it is that dense) over Zoya Arizona. Also, no digging for any white hexes and the bar glitter laid flat! My biggest annoyance is prickly bar glitter!

Now onto the blue. Here is a new way to use your shatters! I didn't have a perfect Mets blue at the time BUT OPI Blue Shatter was perfect! I simply did two coats on shatter for this effect. Of course, this polish dries super fast and matte, so it was easy to do nail art right after I applied the polish. I really like the texture created by two coats of shatter. In order for the orange to pop off the blue, I first did the Mets logo in white.


Then I got really artistic here. It was super sunny and I couldn't really see what I was doing but I thought the background with Citi Field was quite fabulous.

Bonus pictures, you say? Why not!? Do you think I did the logo justice?
And yes, that is one of my jewelry pieces! A simpler one, but I thought it went together well with my blue shirt. I needed that pop of orange.

Lastly, I couldn't help but show you my boyfriend's cat. Because it was my boyfriend's first game ever, I bought him one of those mini helmets filled with ice cream. It just looked so cute on his kitty! We cleaned it first, so don't worry about ice cream all over her face.


Can't wait to continue to show you more nail art the rest of the week? Please feel free to comment on what YOU want to see. Reader's request next week? I think so!

Tuesday, June 12, 2012

Inaugural Post: Cheers to a New Blog!

ehmkay nails has been in the works for quite some time! First I'll give you the short version of me: I'm from the NYC area and I recently graduated with my MA in Literature. I fell in love with nail polish about a year ago, so books and nails are my loves (among other things)! While completing my Masters degree, I did my nails as my way to relax while finishing my thesis. I started buying more colors and doing more intricate nail art designs and layering combos. Eventually, I would take pictures and show it to my friends.

Well the better half of ehmkay nails has been supporting me for a while and begged me to start my blog which I am entirely thankful for! I was also invited into some polish groups on Facebook where they also encouraged my blog adventures! I hope you give me time to experiment with picture taking and join me on my ever evolving blog. And I hope you don't mind if I show you some older nail art as it was this art that really pushed me into the nail polish community.

In coordination with my blog, I am opening up an Etsy shop, ehmkay designs, which I hope you will take a gander at! I have been playing around with layering combinations for over a year and eventually would layer 10 polishes, which is way too much for my nails! My solution: nail polish jewelry! I think my pieces are different from other stores, so do take a look! I will link the store as soon as it is ready (let's hope for this week)!

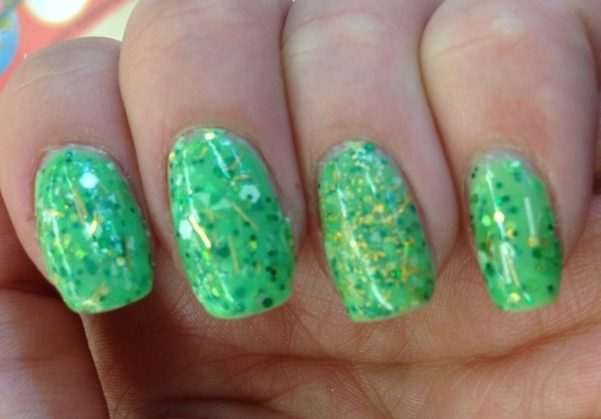
NOW ONTO THE POLISH! A milestone birthday of mine was last week, and I thought what better way to begin my 25th year than with CUPCAKE NAILS (and a blog and Etsy store)! First photo is indoors. The next two are in direct sunlight in NYC as I ran around in my polka dot dress enjoying my day.


I thought they were festive and fun and on principle I took pictures with some Crumbs cupcakes but they are so massive I couldn't exactly get my hand around it. I do have embarrassing photos of me eating the cupcake, if you're interested in those kind of embarrassing photos. 

I do hope you come back to my little blog to see more nail art and combos! I promise I won't hammer on about me! I hope to show you my most meaningful nail art designs this week as a little introduction to who I am!


Polishes used: Zoya Zuza as base. Lynnderella Sweets to the Sweet as Sprinkles.
Thumb: Zoya Michelle with Zoya Sarah
Index: Zoya Dannii with Orly Rococo A Go Go
Middle: Spoiled I'm so Jaded with Zoya Apple
Ring: Zoya Arizona with China Glaze Riveting
Pinky: Sally Hansen Marine Scene with Orly Stone Cold
Cherry: Zoya Sookie with OPI Love is a Racket

I would like to thank my dear friend Ryan for creating my awesome blog and Etsy store banner!